
Fabricista Striped Shirtdress

Overview:
This is my second shirtdress this year and I think this is the start of something as I have two more shirtdress ideas in my head. I am over the moon about how this turned out! Well...save the fact it's a tad snug (quarantine 15).
- Skill Level*: 3/Intermediate only because of the multitude of buttonholes and set in sleeves.
- Sewing Time: a weekend
- Pattern Rating*: 5

Pattern:
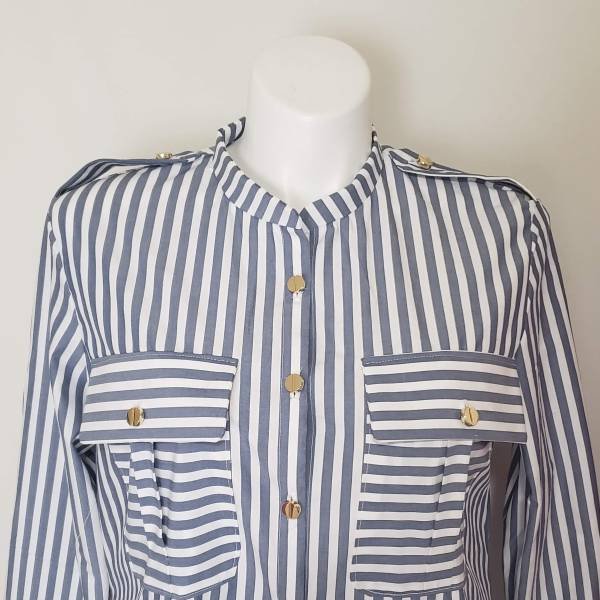
Simplicity 8830 is a pretty traditional shirtdress pattern. It features pleated patch pockets with a flap, epaulets and a shirt tail hem. More functional in seam side pockets are also included. The lack of a collar and the narrow cuffs are a bit of a departure from a standard shirtdress that modernize the look.

I sewed up View A, the dress, and the construction is straight forward, but if you have any confusion Mimi G always provides a video sewalong to help you out. It took me two sessions at my machine to knock this out, but that doesn't include the time I spent hand stitching the collar stand and cuffs. Don't worry the instructions call for stitching in the ditch, but sometimes I prefer to hand stitch.


The only issue I had was with the hem due to its curvature. I opted to use single fold bias tape to finish the hem. I undid about an inch of stitches on both side seams to hem the front and back separately and reattach to avoid having a wonky hem at the extreme curve at the sides.
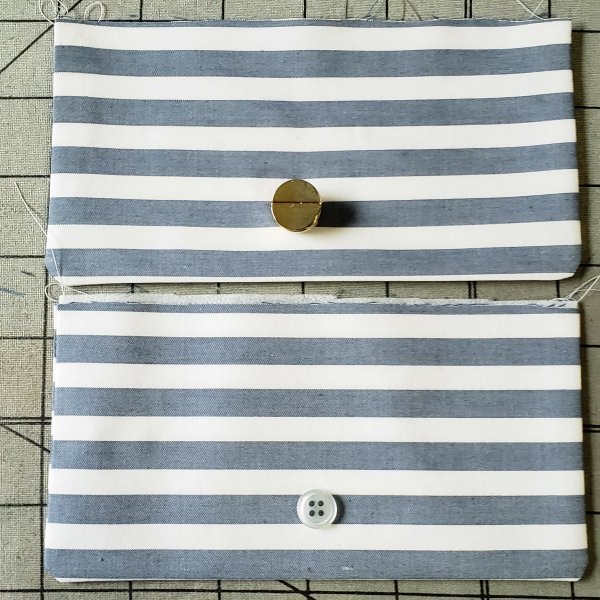
I had a hard time choosing the buttons for this project and it was an important decision as there were SIXTEEN of them. Shout out to my friends on IG for overwhelmingly voting for the gold buttons because they were the right choice. These Milly buttons are also from Fabric Mart AND they are just $1 for a dozen. Check out their Bargin Bin for other great deals on notions. Honestly white buttons would have worked, just not these. The gold buttons dress up the look though and I like it.
Fabric:
This 100% cotton fabric was amazing to sew and press. It has a crisp hand and a smooth finish. It does wrinkle a bit, but hey it's a cotton shirting. Fabric Mart is sold out of this particular fabric, but there are several other shirtings available here.
I'm often drawn to striped fabrics and I've used it in a variety of ways (vertical, horizontal and on the bias). Sewing striped pieces can be a pain if you care about your stripes matching, but as long as you follow the four P's you'll be fine...plan, place, pin and patience.
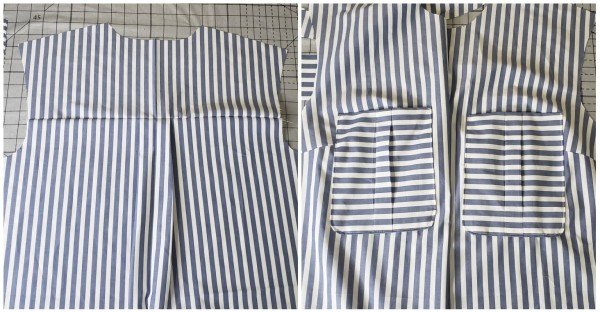
1. Plan your overall look. What direction are the stripes on your fabric and which direction do you want the on your garment? Do you want to play with the orientation? With this dress I knew I wanted the stripes to be vertical like the fabric. I wanted the pockets to stand out so I considered cutting them on the bias, but decided to cut them horizontally. Unfortunately I didn't put much thought in the back so I cut the back yoke wrong, even though the stripes line up well. So don't forget to plan out look and mark your pieces if necessary.
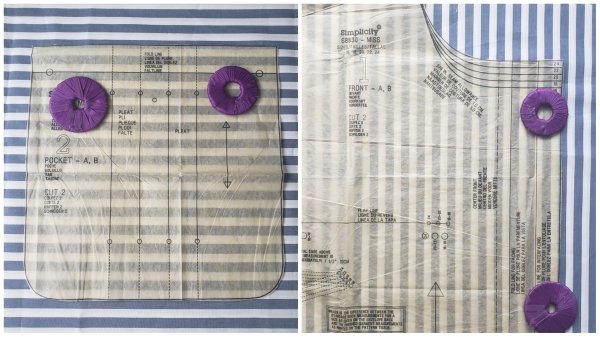
2. Place your pattern pieces on the fabric carefully. Single layer cutting is best for control because the fabric often shifts when folded over. When cutting vertical stripes be sure to line the grain arrow up with a stripe to ensure you piece isn't skewed and you don't end up looking like the leaning tower of Pisa. In my opinion lining up stripes at the side seams isn't necessary, though you may want to check to see if a if the back or front main seam is centered on a stripe for symmetry sake. For horizontal seams like my back yoke/back seam you can match the notches or the center front or back seam lines to make sure there's not break in the stripes. When cutting horizontal stripes I try to line up the waist line or lengthened/shortened line with a stripe to make sure the stripes are perpendicular to the grainline. Also depending on how picky you want to be about your side seams (or any vertical seams) you want to line the same stripe up with the same line for each piece.
3. Pin, pin, pin your pieces together when sewing. The more pins the better to keep all your stripes line up. Depending on the width of the stripes I may pin every other or every fourth stripe. If the stripes aren't equal I pin the narrower of the stripes. If it's a knit fabric I've heard a walking foots helps (I don't have one) to keep the tension in both fabrics equal.

4, Patience is important! I typically don't consider striped projects to be quick turnarounds. I don't pick anything with stripes to make the day before an event. Take your time, take a break, step away if necessary. Rushing typically means you're going to miss something or you will spend a good bit of time with your seam ripper.

Modifications:
None other than using bias tape for the hem. I would shortened by an inch or two next time. Oh and I omitted the button and buttonhole at the collar stand, because my buttons are heavy and I would never button it anyway.

Summary:
Pattern: Simplicity 8830 a pattern by Mimi G
Pattern Description: Misses'/Miss Petite shirtdress from designer Mimi G. features working epaulets on shoulders and functional breast pockets. Design also includes side pockets and tie belt.
Sizing: 6-14, 16-24 (I sewed a 16 bust and waist and graded to a 18 hip)
Difficulty: 3/Intermediate
Fabric Used: A striped cotton shirting from Fabric Mart
Does it look like the photo/drawing on the pattern envelope? Very much so because of my fabric choice.
Were the instructions easy to follow? Yes and of course Mimi has a sewalong if you need any extra help.
Did I make in alterations? None, I will shorten by a inch or two when I sew it again.
Would I sew it again? Yes, maybe in a solid linen.
Would I recommend it to others? Definitely!