
Fabricista Fashion Challenge: Wrap It Up Week 2 Entry

VOTE HERE!
I did a happy dance Friday when I read I was not eliminated. Then I realized that was just the first week and the second challenge was already here! LOL The remaining 5 contestants were challenged to create a wrap dress inspired by Diane Von Furstenberg designs. If you don't know, Diane Von Furstenberg is the mother of the wrap dress, definitely WIKI her. My biggest issue last week was coming up with options from my fail pile to remake. After searching through the dvf.com website and doing a Google image search for “Diane Von Furstenberg Wrap Dress” I was actually overwhelmed with inspiration. Ultimately I selected the two dresse that inspired me the most while I was searching. This gorgeous B&W mixed print A-line wrap dress from Color Me Courtney’s Fashion blog and this flirty halter wrap dress from DVF.com
 I was inspired to blend elements from these two DVF dresses, the juxtaposition of two bold prints like the first dress and the halter neckline of the second. I knew I needed a wrap dress pattern with separate bodice and skirt pieces that was also a halter dress. I have several wrap dress patterns but the only pattern in my stash that had a halter-ish neckline was M7119, which was great because it was on my summer to sew list but I never got to it. I could have left it at that but I also really liked the mix of the solid bodice and printed skirt of the halter inspiration dress. Suddenly it hit me that I could have both a mix of two prints and a solid/pattern pairing if I made the dress reversible! So that was the game plan.
 My mind immediately went to black and white prints, but I didn’t want to make a replica of either dress and my entry last week was black and white. Instead I picked these two bold ITY prints, a multi colored chevron and a large scale circle pattern, which shared the same colorway of white, pinks, orange and purples.
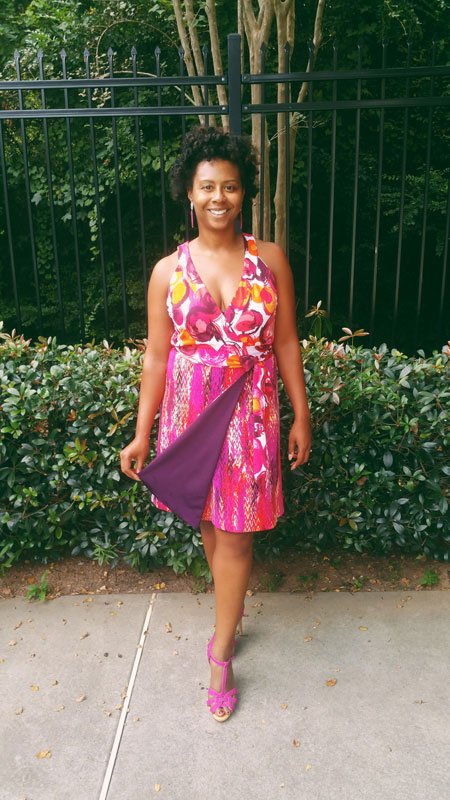
 Thankfully M7119 was not too difficult to adapt to make it fully reversible. I cut out the pattern pieces as called for but cut an extra piece (or set of pieces) for the bodice front, bodice back, skirt front and skirt back. My original plan was to use the two prints for one side and a solid bodice and printed skirt for the other side just like the halter inspiration dress. Unfortunately, I didn’t have enough of either print for the skirt of the second side. I had to change up my plan and decided to keep the same print for the bodice on both sides and add this eggplant ITY for the skirt.
 I followed the pattern directions for the bodice construction though I did it twice for the inner and outer bodice. Then sewed the inner and outer bodice pieces together at the armholes so I could work with it as one fabric. I sewed the tied ends together and attached them to the front bands. I skipped the interfacing for the front and back bands but attached them to the bodice as per the pattern instructions. Slip stitching was necessary to keep the construction as clean on the inside as the outside. Next I constructed both the inner and outer skirt as instructed except I attached the skirt pieces first at the hem and then the sides with front sides facing. This gave me clean seams on both sides of the skirt. The final step was to attach to skirt to the bodice, which was a little tricky for me but I figured it out. I placed the bodice right side out inside of the skirt piece right side in and sewed around in a skirt leaving about a 2” hole so that I could turn the dress right side out. The last step was to slip stitch the hole so it was unnoticeable from the outside.Here is it! My first fully reversible piece and my first true wrap dress. I hope you love it as much as I do. If you do please VOTE HERE so I can make it to Week 3!


